by John E. Lodge, published in Popular Science, March 1937
(Warning to sensitive readers: this article contains some references to butchering rabbits for pelts. — AngoraRabbit.com Editor)
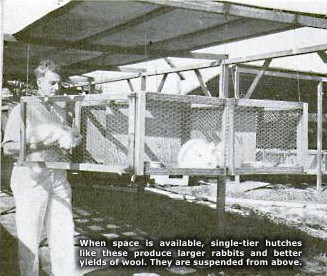 In the small quarters of your own back yard, you can grow your mother’s fur coat, sister’s knitted suit, and brother’s sweater, with a pair of warm socks left over for dad.
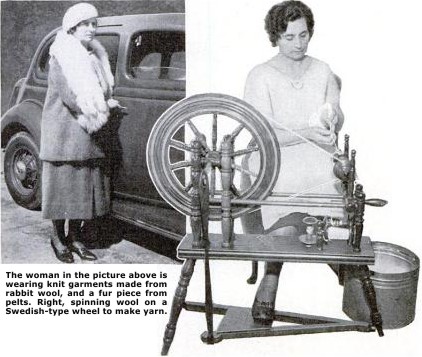
With two dozen Angora rabbits you can produce enough wool to supply the family with the finest knitted garments the market affords; and from the progeny of your first stock, you can secure fine pelts for neck pieces and coats which rival in beauty the most costly to be had anywhere. Tan your own skins, spin and dye your own yarn. Methods are simple and inexpensive. It’s the newest thing in fur farming, too. Three years ago, Angora rabbits were little known in the United States. Today there are 300 professional growers in southern California alone. Countless amateurs, particularly on the Pacific coast, are producing their own garments from these sons and daughters of Asia.
Let’s suppose you are interested in Angoras and have decided to try your hand at growing these fine animals, both for pelts and wool. How much need you invest; how much room do you require; how may you turn the skins and wool to practical account?
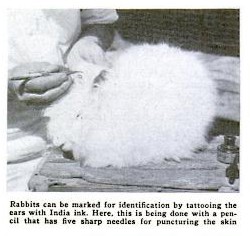
 At the outset, you should acquire your stock with considerable care, for many white rabbits are “woolly” without being Angoras. If you select animals that are well tufted on the ears, with short bodies, heads broad and well furnished, and feet and bodies generally well-wooled, you can’t go wrong. As a further test, cut off some wool and throw it into the air. If it floats, rather than sinks heavily, you can be assured that the rabbit is an Angora.
You need no more than four does and one male to start your backyard wool farm. Thereafter, you may breed the does every ninety days. Keep only the four strongest from each litter, for they not only will grow more rapidly but will attain more total weight than a large number. Thirty dollars will cover the initial costs, including both stock and breeding hutch, and you need a plot no larger than twenty feet square.
An ideal breeding hutch is forty-eight by thirty incites, and eighteen inches high, with one- half to five-eighths-inch hard- ware cloth (coarse wire screen) for the floor and one-inch mesh chicken wire for the sides, pro- vided the hutch is sheltered from the weather. If it is outdoors, put on a roof with six to eight-inch slopes, with the front edge of the roof extending out eighteen inches. Cover the roof with tar paper. Construct back and sides from half-inch boards. Face the hutch south for cool- ness in summer and for warmth in winter. Suggestions for the design of hutches, feeders, nest boxes, and runways can be obtained from the breeder’s associations and from state or federal agricultural agencies.
 Since you are creating wool, not flesh, the Angora’s diet will vary slightly from that given other rabbits. Give each two oats or barley in the evening, for a total of two and a half ounces. It is better to use cut, dry alfalfa, of good quality only, to avoid scours or bloat.
If you do not feed too heavily, the rabbit will clean up his meal in twenty minutes. Should he leave any of his food, the chances are that he is suffering from wool block in the intestines. To remove the block, give the rabbit one teaspoonful of mineral oil. If he is subject to block, apply this remedy once a week. Should he not respond, and appear feverish, give two tablespoons of epsom salts and place him on the ground where he can exercise, giving a vegetable diet for three or four days. This treatment usually will bring him around.
When ready to clip, place the Angora on a stand or stool with a top just large enough to permit the animal to sit without turning around. Brush thoroughly, using a stiff bristle brush, taking care to clean out all foreign matter. Part the wool down the center of the back. With an ordinary pair of well-sharpened, blunt-pointed scissors, start from the rear and work forward, taking sections down and around the animal. Insert the lower jaw of the scissors near the end of the part and clip down this line, holding the upper part about half an inch from the animal’s hide.
As you proceed, take care to separate the various grades of wool by length. This is particularly important, since the longer wool is worth about ten times as much as that in which long and short hairs are mixed. Continue clipping until you have finished one side, turn the animal over and clip the opposite side, then the rump. Be very careful in clipping: near the tail or you may cause an injury.
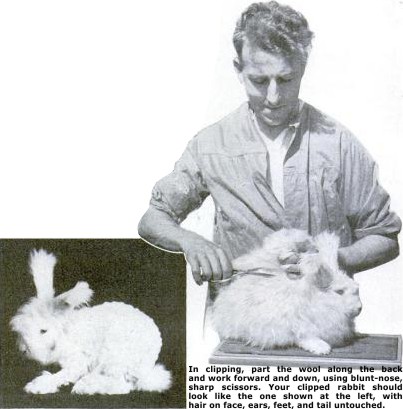 If you have been clipping a breeding doe, you have now finished your task. Bucks and young stock, however, may also be clipped on the belly and breast. To accomplish this, place the animal’s ears down over the shoulder, pick up gently both the ears and the loose shoulder skin, raise the animal, and rest its rump on the stool. Now proceed to clip, taking the wool first from the breast and then from the belly. If the Angora becomes too active, hold it up by placing the skin of the forehead between your thumb and forefinger. After a little experience, you will find you can clip an Angora in six or seven minutes.
Since the wool may suffer from too much hand- ling, place each grade by hand in a separate receptacle. If it is to be stored for any length of time, it is better to use some good moth repellant. Do not press the wool down in the sacks or cans, but lay it in carefully. Tight packing frequently causes webbing, for the wool has a high felting capacity.
The young may be clipped when eight to ten weeks old, and about every nine weeks thereafter, depending on the length of wool you desire. Wool from two to two and a half inches long is worth about four dollars a pound, while that exceeding three inches will bring six dollars. Since an Angora produces, on an average, twelve ounces each year, and some up to twenty- three ounces, it is important to take the longest wool possible and preserve it in packing and shipping.
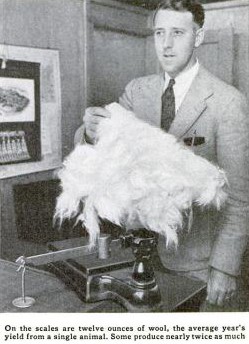 Here are a few tips which will help you avoid mixing grades: Never clip ear tufts or furnishings on the face; never clip the wool underneath the feet; never clip over a second time to make your job look bet- ter, for this short wool is worthless. With a little experience, you will soon be doing a first-rate job of clipping.
Hand-spinning this fine wool is quite practical as a hobby, and from it you can produce many articles of value, from scarfs to sweaters. The wool also takes dyes nicely, and will retain color from better grades of dye without fading. Use a spinning wheel of the Swedish type, spinning the wool as it is clipped from the rabbit in exactly the same way as sheep’s wool is spun. It is not necessary in hand-spinning to card the wool, as is required in high-speed commercial production of Angora wool yarn.
It is advisable to use raw wool from two to three inches in length. Long wool is easier to work and less apt to shed after spinning. It should be spun in a single strand, then double-twisted. Because it is lighter and warmer than other yarns, this double twist will be found quite heavy enough for sweaters, baby garments, and hosiery; for any garments, in fact, that are ordinarily made from yarn.
Also, you can easily produce fluffy, snow- white pelts for beautiful furs, especially neck pieces, from Angoras. The wool is finer than silk and wears better than most rabbit fur. By feeding properly and giving the animals good care, you will be repaid in the fineness of the fur.
In order to save the pelts after killing the rabbit, slit down the insides of the legs with a small knife and also about the neck; then, by peeling down the fur over the legs and hind quarters, strip the fur from the body, leaving the flesh side out. Where necessary, use the knife to separate skin from flesh, particularly along the abdomen. A pair of pruning shears will be useful in severing the feet. This is known as a “cased” skin, and is more easily dried and brings a better price than those slit down the front.
Special wire stretchers may be purchased for stretching cased skins, or you may easily make your own from wire or a board. Use either eight or ten-gauge galvanized wire, and bend it around a rod the size of your finger, making a complete loop and leaving twenty-three-inch prongs projecting at the ends slightly out from parallel. A board rounded to shape and fitting the average-size pelt, may be used, but drying will be slower. Place the pelt, inside out, over the stretcher, legs on one flat side, back on the other. Hang in a dry place until all moisture has left the skin. This will take about ten days.
It is important to know when the rabbit will yield a good pelt. As a general rule, it will do so at any time except when molting. Molt in the pelt is usually noticed as a break in the licking. If Use pelt shows no ticking, a gentle pull of the fur near the rump may show loose hairs. Blowing into the hair should show new hair at the base near the skin. A dark discoloration of the skin before or after dressing usually indicates molting. Since the first molt starts when the animal is six to eight weeks old, the pelt will be in good condition previous to this first molt, and will be ready for use again when the rabbit is about six months old.
Best furs are taken between October and April from rab- bits approaching six months of age. Pelts giving fur about an inch and a half long may be made into beautiful, silky jackets and various fur pieces. Coarse and thin fur should be avoided; likewise, the color of the fur should be uniform and free from hutch or blood stain or sun injury.
If you do not wish to send your fur to a professional tanner, make sure it is well- fleshed at the beginning of the curing process. Place it in a bucket half-filled with water containing a handful of common salt. Leave lite skin in the water until it becomes quite soft, then place it on a flat board and with a blunt knife or a pumice stone detach the tissue from the skin, beginning at the hind legs at the edge of the skin. Take care not to tear the skin while removing the tissue. With the skin thus primed, you now may make your tanning solution, using four ounces of chrome alum, one and one eighth ounces of ordinary soda, and eight ounces of ordinary dextrine. Place each of these ingredients, in a separate twenty-four- ounce bottle, fill each with water, and shake the alum until it has dissolved. Take three ounces from each bottle, adding the soda to the alum, always stirring, then add the dextrine.
Pour twenty-four ounces of cold water into a bucket, add half of the liquid, and place the skins in this solution. Move the skins occasionally to make sure they are thoroughly saturated.
Let them stand twenty-four hours, and add the rest of the solution. The entire nine ounces of tanning liquid is now mixed with the water. Let this stand another twelve hours, hut not more than twenty-four, and by that lime the skins will be well tanned. After removal, wash the skins thoroughly and place them in a second bucket containing a mixture of chalk and water. Leave them for one hour, then wash the skins in cold water.
Because the pelt has now been softened, it should be worked over a board and wrung out and twisted until it becomes quite dry and pliable. To assure return to its former luster, work in one part of neat’s-foot oil to two parts of Castile soap dissolved in water. Following this, the pelt may be hung up in a moderately warm place for drying, after which it may be worked again until all hard spots have disappeared. All traces of grease and dirt should then be removed, which can best he accomplished by placing the skin in a box of fuller’s earth and shaking it well several times. After about two hours, remove the skin from the box, shake it well again and brush out all traces of the clay.
By following the twelve rules below, offered by the University of California College of Agriculture, you will be able to produce finer Angoras at lower cost:
- Buy stock from a reliable breeder. If in doubt, inquire of the breeders’ associations.
- Start with only one breed. Do not attempt to mix Angoras with others.
- Keep hutches dry, sanitary, free from drafts; provide plenty of sunlight.
- Isolate all sick or diseased animals and destroy those which cannot be cured; do not change feeders or dishes from one hutch to another without first disinfecting the equipment.
- Use only mature rabbits as breeders and plan to raise four litters to a doe each year.
- Use well-built, economical hutches, which will prove inviting to guests and prospective buyers.
- Cull out all inferior stock and plan to improve the quality of your animals gradually by using only the best breeders.
- Feed regularly and use a well-balanced ration.
- Buy feed in quantity at the season when prices are lowest. Maintain an economical unit and keep costs down.
- Do not buy inferior or diseased stock at any price.
- Do not keep does that have outlived their usefulness.